CategoryProjects

Things I’ve Done

The Smart(er) Cat Feeder – Tying it Together With Code

Now that I have a Raspberry Pi that can take pictures and turn electrical sockets on and off, as well as a trained image classifier that knows my cats, it was time to stitch everything together.

The Lola Detector

The following steps were taken to construct a small program that would scan an image on demand and identify Lola (or not):

  1. Install TensorFlow on the Raspberry Pi as a Python library.
  2. Refactor the example image label Python script to start TensorFlow, load the model, and wait.
  3. Use Flask to create a URL that would kick off the image analysis function, and return a JSON object with the Lola/Maddie label probabilities.
  4. Keep this program running.

The code for the Lola Detector can be found in a Gist.

Please note, this is the first Python script I’ve ever written. Feedback (maybe) appreciated.

The Lola Feeder

Rather than use Python for the whole app (like a sane person), I opted for Node to do the rest of the stuff. A big, convoluted Node script does the following:

  1. Takes a picture with raspistill and saves it as rpicam.jpg.
  2. Sends an http request to the Lola Detector service, and waits for a response.
  3. Checks the response for a high Lola probability.
  4. If Lola is NOT found, go back to step 1.
  5. If Lola is found, send a signal via the FM transmitter to power on the cat feeder.
  6. Send a tweet with the recently taken picture to a hidden Twitter account.
  7. Send a message to IFTTT which sends me a push notification.
  8. Wait 60 seconds and send another signal to power off the feeder.
  9. Wait 90 minutes and go back to step 1.

Additionally, I have a small lamp attached to another RF power socket, and have a “cron job” that turns the lamp on for a few hours in the evening, and a few hours in the early morning.

Here’s the code for the RF thing. I also have a white noise machine, another lamp, and some Christmas lights hooked up to other RF outlets. Unfortunately, the Xmas lights outlet stopped working :(

To run and monitor both scripts, I use PM2. It’s awesome. You should use it, too.

The Smart(er) Cat Feeder – Training TensorFlow

How does a computer know the difference between two cats? An image classifier created from a trained neural network, of course! Seriously though, I’ve always figured the realm of machine learning is out of my reach, but some of the tools are becoming more accessible to lay-people. This video was quite reassuring:

Learning About Machine Learning

With a confident attitude I went out searching for some ideas on how to create my own classifier. Luckily I didn’t have to look far. Google’s most basic introductory tutorial happened to fit my problem like a glove. takes you from nothing to a custom image classifier in less than an hour. It also leaves you with all the tools you need to keep using it with your own images… which is what I did.

Cat Training

The basics of creating the classifier went like this…

I needed pictures of my cats. Lots of them. Like hundreds. So I fired up the picam on the Raspberry Pi to record for a couple minutes while ‘nudging’ each cat in front of the camera in various positions and with different lighting. For this I used the raspivid program that comes with Raspbian. The following command records ten seconds of video:

<

pre>raspivid -o video.h264 -t 10000

For image extraction, I used ffmpeg and the following command to output an image for every second of video:

ffmpeg -i video.h264 -vf fps=1 out%d.png

The ffmpeg docs have lots of useful snippets. Oh, and ffmpeg can be installed as a command line utility via Homebrew on Mac (brew install ffmpeg).


The images were all in PNG format, and I needed .jpeg for Tensorflow. Luckily, OS X has a built in batch conversion tool right in the Preview app. See OSXDaily for details. After the conversion, the images were sorted into two folders – one for Lola, the other for Maddie.

For the training, I simply repeated in the Tensorflow for Poets tutorial, but used ‘lola’ and ‘maddie’ pictures instead of roses and daisies. I used 4000 iterations for extra thorough training. The basic command is below. Of course, instead of flower photos, I obviously had cat photos.

# In Docker
python tensorflow/examples/image_retraining/retrain.py \
--bottleneck_dir=/tf_files/bottlenecks \
--model_dir=/tf_files/inception \
--output_graph=/tf_files/retrained_graph.pb \
--output_labels=/tf_files/retrained_labels.txt \
--image_dir /tf_files/flower_photos

The main output of this training is the model file (retrained_graph.pb), and the accompanying labels file (retrained_labels.txt). These are the files used in the program that will examine new pictures of my cats and determine which one is which (if any cats are present at all).

Finally, I could take the label_image.py script from Step 5 of the tutorial, and use that to analyze new photos of my cats and tell me the confidence of Lola or Maddie being present in the image. All this runs from inside the original Docker image like so:

curl -L https://goo.gl/tx3dqg > $HOME/tf_files/label_image.py
docker run -it -v $HOME/tf_files:/tf_files  gcr.io/tensorflow/tensorflow:latest-devel 
python /tf_files/label_image.py /tf_files/new_lola_pic.jpg

Notice in the last line I used a picture of lola instead of a daisy. The output was something like:

lola (score = 0.99138)
maddie (score = 0.35342)

Even though Maddie was not in the picture, the confidence was pretty high. I’m guessing because Maddie is a nearly solid black cat, any dark mass in the photo may appear to the model as Maddie. Luckily, if Maddie actually is in the photo, the confidence is much higher. Here’s a score with Maddie, but no Lola:

lola (score = 0.01483)
maddie (score = 0.99683)

Good Job, computer!

The Smart(er) Cat Feeder – The Raspberry Pi

This is part 2 of a series describing modifications to an automatic cat feeder used to selectively feed cats. The overview can be found here:
The Smart(er) Cat Feeder Starring TensorFlow and Raspberry Pi

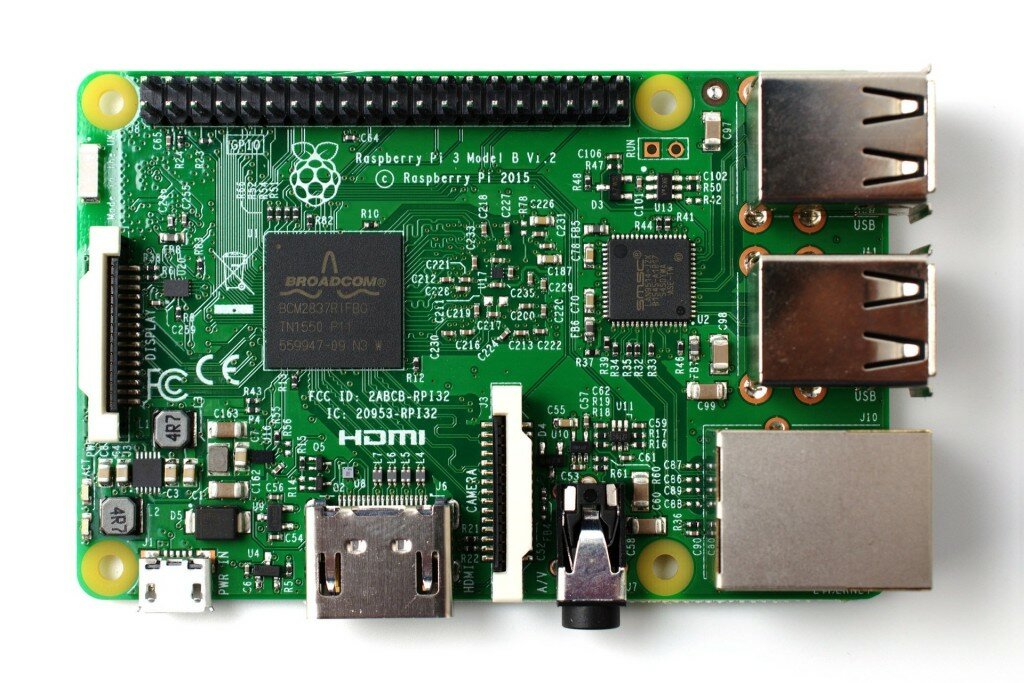
The Raspberry Pi 3

image curtesy raspberrypi.org

image curtesy raspberrypi.org

A Raspberry Pi 3 has just enough horsepower to run pre-trained TensorFlow apps, and a bunch of code for getting up and running on the Pi. There’s also a burgeoning IoT and hacking community, which makes is a great hub for controlling internet connected stuff.

A basic Pi setup needs a bit of hardware:

  • A SD Card. I recommend 32GB – 64GB to have plenty of room for TensorFlow models, pictures, and video.
  • . There’s no power cord, so I got a 10ft. micro USB cable and 5V adapter.
  • A RPi case. Plenty of these out there. I got a cheap plastic one for a couple bucks on eBay.

And the basic software setup:

  • Raspbian & Pixel Desktop. I went with the new desktop GUI rather than headless to try out Pixel, and to do development and testing right on the Pi itself without another computer.
  • Add a hidden network to the Wifi list:
    sudo iwlist wlan0 scan essid [yourSSID]
  • Less cruft. Raspbian comes with too much stuff. Easy to remove, though.
  • Node.js 7
  • VNC. In case I did want to log in remotely, I had to fiddle with the video settings in
    /boot/config.txt

    to get a decent sized window. Using hdmi_group=2 and hdmi_mode=27 did the trick.

The Raspberry Pi Camera

Pi Camera

I read a few places that the version 1 (5MP) camera module is better with auto focus than the v2 (8MP) module, so I got a v1 from eBay for about $15. I’m not dissappointed. I ended up using 600×600 pictures in the project anyway, so extra megapixels would have been wasted, and all the features (focus, white balance, filters, rotation, etc…) work great.

There are some clones of the camera module from China for a few dollars less, but why risk it? I did, however, order a protective camera covering from China for $1. I’m still waiting on it as of this writing, though.

Remote Control Sockets and RF Transmitter

outlets

Here’s where the real fun begins. To turn the feeder (and accompanying lamp) on and off, I used remote controlled outlets, but spoofed the remote control frequencies with the Rapsberry Pi and a radio frequency (RF) transmitter attachment. In order to get the RF codes to activate the outlets, a RF receiver attachment is necessary as well. Luckily, the receiver and transmitter are sold in pairs, and are really cheap.

I followed a couple great guides for inspiration and to set up the proper tooling;

The guides above go a few extra steps and set up a web server with PHP, but I skipped that in favor of using Node (more on that in the next article). The basic steps for the setup are as follows:

  1. Install WiringPi and RFSniffer
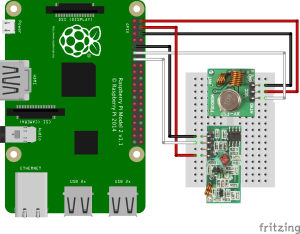
  2. Plug in the reciever to the Raspberry Pi. Wiring Diagram
  3. Start RFSniffer.
  4. Push all the buttons on the remote control, and write down all the codes. It will look something like
    Received 21811
    Received pulse 192
    Received 21813
    Received pulse 192
    
  5. Plug in the transmitter to the Raspberry Pi.
  6. Test the codes with codesend. Be sure to substitute in your own code and pulse values read from RFSniffer.
    ./codesend 21811 -l 192 -p 0
    

When buying outlets, the popular choice is . Amazon was sold out of these when I was looking, so I got . One of the outlets broke a day later, so I’d recommend ETekCity.

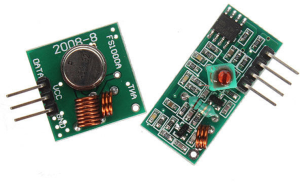
Also, the first RF Transmitter I got was busted. I noticed that the circuitboard was slightly different than those pictured in the guides I used. Instead of ‘data’ printed on the transmitter, it said ‘ADAT’. I returned the set, and ordered a receiver/transmitter with ‘DATA’ and everything worked fine.

BAD! Avoid this one!

BAD! Avoid this one!

GOOD! Buy this kind!

GOOD! Buy this kind!

Good to Go!

With the Raspberry Pi set up with a working camera and the ability to turn electronic devices on and off, the stage was set. The rest was just a simple matter of programming…

The Smart(er) Machine-Learned IoT Cat Feeder for Lola the Cat – Overview

tl;dr – I modified my cat feeder to only feed one of my two cats using a Raspberry Pi webcam and image analysis with TensorFlow.

Meet Lola

Lola Resting

My cat for seven years who is healthy and fuzzy and an all-around good cat. However, she is a very picky eater. She takes small bites of food sporadically throughout the day from a food dish just for her on top of a tall dresser.

Meet Madison (Maddie for short)

Hi Maddie

Obese cat that was recently put on a strict diet of canned food twice a day (no carbs!). Due to her obesity, she’s been unable to leap onto the dresser to eat Lola’s food. Until now. Perhaps she’s regaining some athletic ability with the new diet, or her appetite has overwhelmed her fear, but a couple weeks ago she finally made the leap to the bounty of Lola’s food dish. Not good.

The Problem

Lola likes her dry food (a mix of Science Diet and Orijen), and only eats a tiny bit at a time whenever she wants. I’ve made several attempts at getting her on a schedule, but this results in incessant yowling at all hours along with a stubborn refusal to eat during the allotted mealtime. All was well when Lola was the only cat with the leaping ability to reach the skyward food dish. Now there’s no place for cat food to hide that Maddie won’t find.

I needed a way to keep Maddie on her diet, but allow Lola to peck at her food when she decides it’s mealtime. If tiny portions of food could be presented to Lola, she would eat all of it leaving none for Maddie. But how to get Lola (and not Maddie) tiny portions of food when I’m away at work or sleeping?

The Feeder

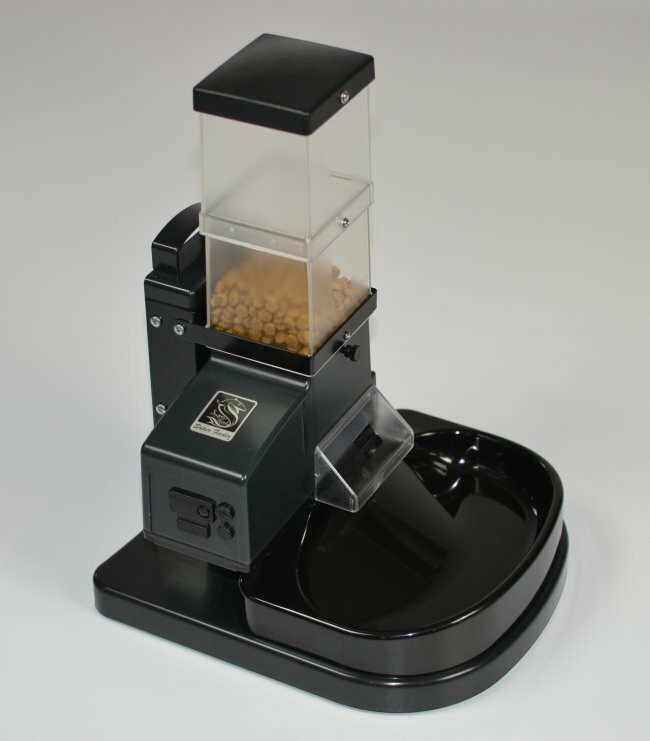
CSF Super Feeder

I bought an automated cat feeder a few years ago to dispense food to the cats whilst on vacation. It’s sturdy, but very primitive compared to today’s IoT designs. It works by plugging into a wall timer, and dispensing food for a short duration when AC current is supplied, and then resets when the power is cut. The amount of food dispensed is determined by twisting a small potentiometer with a tiny screwdriver (seriously!).

If the Feeder Only Had A Brain

I have a cursory fascination with machine learning, and sometimes read about what’s what in the ML world. TensorFlow has been a hot topic of late, and they have a few dead simple tutorials for lay people like myself. shows how to retrain an image labelling model to recognize objects of your choosing… like perhaps your own pets.

I thought maybe, just maybe, I could fiddle with the TensorFlow tutorial’s code and cobble together a system that allows the feeder to ‘recognize’ Lola and dispense a tiny meal for her, but refuse service to Maddie. Given the simple nature of the feeder (plug in = food, unplug = reset), some sort of smart-plug for the feeder would work just fine.

The Bright Idea

Grinch Smirk

I have a couple Raspberry Pis lying around (what self-respecting tech nerd doesn’t?), and decided to use one for the guts of the operation. The full solution looked something like this…

Set up the RPi + camera to watch for cats mulling about near the feeder. Periodically snap a photo, and analyze said photo with TensorFlow to find Lola. If Lola is identified in the image, flip the switch on a smart plug or relay connected to feeder with the RPi. Then shut off the power to the feeder and sleep for an hour or two before allowing another feeding. We don’t want it constantly spitting out food while Lola is eating.

The Working Contraption

feeder1

After a few days of tinkering, trial and error, ordering bits and bobs from the internet, and convincing my wife that I’m not crazy, I finally got a working version! As I suspected from the outset, it’s very much cobbled together and has a few quirks, but it does what I set out for it to do – feed one cat, but not the other.

(Quick reminder, I do still feed Maddie, but only twice a day with incredibly expensive cat food that I swear is better than what I eat some days)

The parts list for the working prototype are as follows…

  • The SuperFeeder brand cat feeder
  • A Raspberry Pi 3
  • 32GB MicroSD card for RPi (with latest Raspbian)
  • 5v power adapter for RPi
  • (5mp)
  • ( ETekCity )
  • Thin copper wire (for an antenna)
  • A box and/or stand for the RPi

The software involved includes…

  • Raspbian OS
  • TensorFlow
  • Python (and Flask)
  • Node.js
  • ffmpeg
  • IFTTT/Twitter/Twilio account (optional)

The “How it Works”

The RPi is set up near the feeder in a small box. The camera is pointing to the area in front of the feeder. After turning on the feeder, a python script bootstraps TensorFlow which loads the trained model into memory and gets ready to analyze an image. It waits until it is triggered by a GET request set up with Flask. So TensorFlow twiddles its thumbs, waiting patiently for some work to do.

Concurrently, A Node script fires up to do the ‘detection and feeder’ cycle. The script goes a little something like this…

A picture is taken with the camera. After the photo is saved to disk, the Node app calls the python service which analyzes the image and returns some JSON data. The data includes the probabilities of Lola and Maddie being in the image. If the “Lola probability” is greater than 99.3%, the Node script sends an RF signal to turn on the outlet with the connected feeder plug. The feeder gets power and dispenses a tiny bit of food. After a few seconds, the Node script sends an RF signal to turn off the feeder, then sends a message to IFTTT to alert me that Lola got food. It also copies the last image taken into another folder and timestamps the filename. The cycle then times out for 90 minutes, and then resumes taking pictures.

It all works surprisingly well, except at night when the camera sees only blackness. Luckily, the RF controlled outlets come in packs of five, so I hooked up a lamp to another one and have the Node script also turn the light on for a couple hours in the evening, and early in the morning (Lola really likes to eat at 5:30am, and she lets us know it).

The IFTTT notification and copied image are nice-to-haves that let me keep an eye on things until I get a better interface put together. It also lets me check out any false positives that might occur, and give me better ideas for retraining the TensorFlow model.

On the TODO List

  • Definitely a sturdier box and camera mount. Lola has already threatened to knock the whole thing off the desk (as cats do), and barely a tap will knock the camera out of place.
  • A PIR motion detector to trigger the camera instead of running the camera non-stop. Not sure how useful it would be, but I have a PIR sensor, so why not?
  • A database to record data. Collect feeding times and pictures to get a better idea of Lola’s eating habits.
  • A web interface. It would be nice to adjust the timeout between feedings, manually trigger a feeding, control the lamp, and generally see what’s going on via the web.
  • A Maddie scarecrow. Sometimes Lola does’t quite eat all the food, and Maddie jumps in behind her to finish the job. Might be worthwhile to play a loud noise or something if Maddie is detected (but not Lola) soon after a feeding occurs.
  • 100% Python. I used Node because I know Node, but there’s no reason this couldn’t be one Python script instead of two separate programs. Someday I’ll fulfill my dream of learning Python, and may refactor this project accordingly.

Stay Tuned

More posts will follow on the technical details of the implementation. TTFN!

A Phaser 2.0 Game: Welcome Back Alex

welcom_back_alex

As Christmas 2014 approached I was faced with the yearly conundrum of what to gift to my various loved ones. I think I did an adequate job selecting items for most people, but I wanted to get my brother something good since he’s been out of the country for two years teaching English in Korea.

I saw this as a good opportunity to finally try out the Phaser framework that I’ve been following for quite some time, but never really used. Phaser is a game-making library written in JavaScript that provides a ton of great utilities for making 2D games that work on the web.

Phaser.io Given that Christmas was my deadline, and I started in mid-November, I had to be pretty modest in my expectations. Learning a new framework, and coding everything by hand (as opposed to using graphical tools like Construct 2 or Unity) further exacerbated the time constraints. Luckily, with the help of several online examples and some darn good official documentation, I was able to squeek out something the kind-of passes as a “game” and provided a few hearty minutes of entertainment on Christmas day.

The game itself follows my brother, Alex, on his journey home from Korea. In level one, Alex must protect the school-children from the invading Zerglings. In real life, Alex spent a few months bumming around the South Pacific backpacking through jungles and across beaches. So in level two, the objective is to cross the beach, avoiding obstacles and find the lovely lady. Finally, Alex reaches home (Wisconsin) and decides to take our parent’s new dog, Sophie, for a walk – in the middle of the street! Avoid the cars and win the game!

The source code is available on Github, and I can’t promise that it’s great. The modules are haphazardly written and there’s definitely some copy-pasta going on in a few places, but I tried to take as many queues from the official docs as possible in regards to best practices. Follow the links below to play the game, or view the code.

Play the game!

Grab the source code!

JavaScript Powered Stuff

CODE | SLIDES

What Did I Just Watch in That Video?

That video was the culmination of me experimenting with a Spark Core device, the Johnny Five library, a Sphero toy, and the Cylon.js library (along with some other JavaScripty stuff).

Here’s what is really going on in the video…

My computer is running a Node.JS application of my own creation called owLED (available on GitHub).

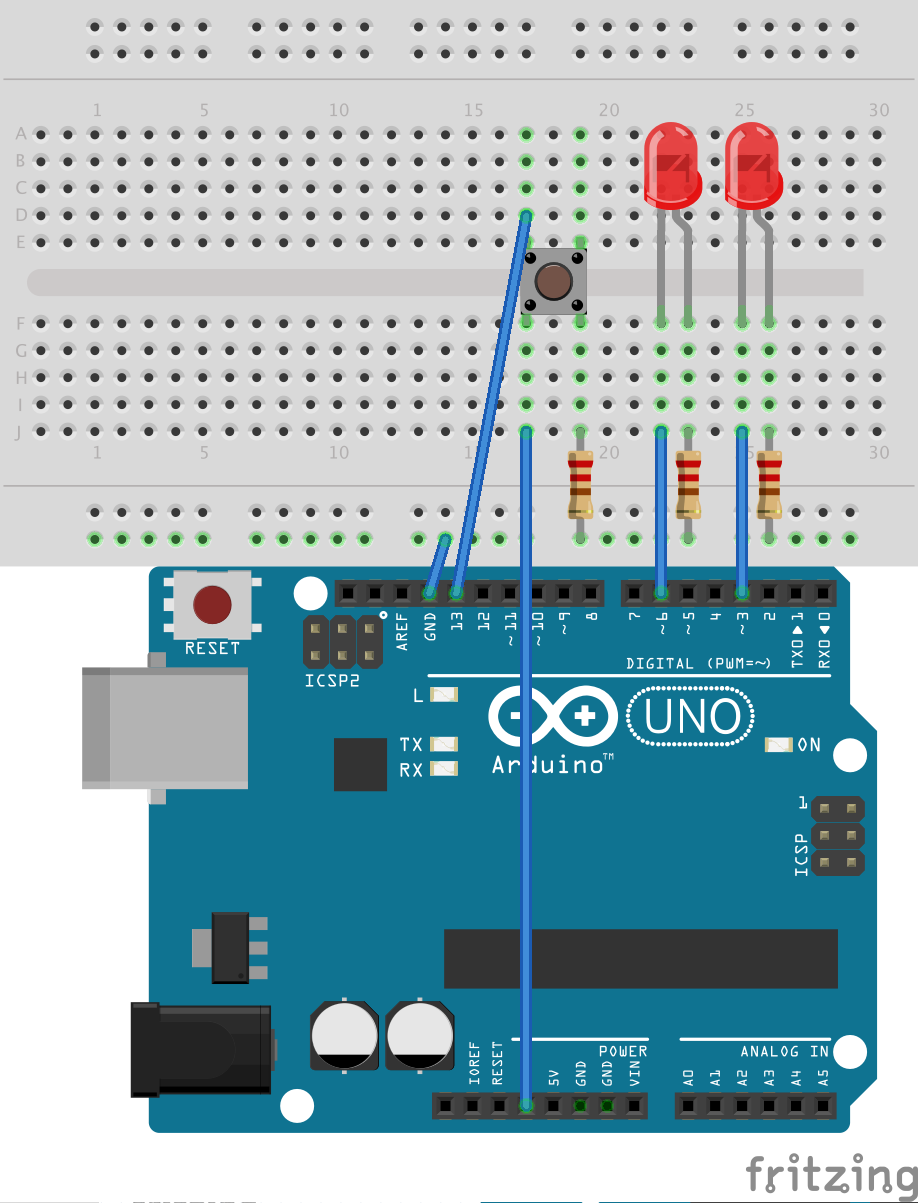
Connected to my computer is a Spark Core device (basically a wireless Arduino). Attached to the Spark Core are 2 LED lights – one red, one greenish-white – and a pushbutton, all connected with some wires via a breadboard. See the amateurish image below for something that resembles what I put together.

owLED_bb

The owLED Node.JS application does a few things…

1. Serves a page with a picture of an owl at http://localhost:3000
2. Creates a Socket.IO connection between the browser and the Node app
3. Loads a Johnny-Five module that blinks the LED lights when the button is pushed, then emits an event when the blinking is complete (along with the on/off status of each LED).
4. Loads a Cylon.js module to connect to Sphero. The module exposes a function to change Sphero’s color, and roll Sphero ‘forward’ a short distance.

With all these pieces working in concert, we have a (crappy) little game! When I push the button on the Spark Core, the LED lights blink randomly for a couple seconds then stop. The LEDs can be either on or off when the blinking sequence ends.

Meanwhile, in the browser, players try to guess if the LEDs will be on or off when the blinking ends. They do this by turning the Owl eyes ‘on’ or ‘off’. If the owl eyes match the LEDs, a point is scored. If a point is scored (by any player) Sphero rolls forward!

owledpic

Why Did You Do This?

I went to JSConf US this year (2014) and got a Spark Core device in my swag bag. We also spent a whole day playing around with NodeBots (I did the NodeRockets track)! In the spirit of community and learning and what-not, I decided to demo some of the cool stuff I learned about to the local Memphis Tech community at a Meetup event. The OwLED Guessing Game was what I came up with. It demo’d some cool JS libraries, and took advantage of what hardware I had available.

The presentation was on July 17th, 2014 and kinda flopped. Despite tons of preparation and ensuring that everything would work right, it didn’t. I only had a 15 minute speaking slot, and the Arduino I was using refused to blink during the live demo. It worked just fine an hour earlier, and of course, still works fine now, but alas. Murphy’s law was in full effect.

I Want to Try, But Don’t Have a Spark Core or Sphero…

No worries. The OWL portion can work on its own with the ‘owled-fake.js’ module swapped out for the ‘owled.js’ module. The Sphero code is on a separate branch from master in the GitHub repo. Take a look at the instructions in the README.

Also, there is alternate code in the ‘owled.js’ module for a regular Arduino Uno. A hastily drawn diagram is below…

ArduinoOWLED_bb

Anything Else?

Here’s all the things I used in a big list!

  • Node.JS – Acts as the ‘hub’
  • Express – Serves the web page
  • Socket.IO – Allows events to be ’emmitted’ between the browser and the server in real-time.
  • AngularJS – A nice front-end framework to build the client-side functionality.
  • Redis – Used to keep track of all the blinking outcomes (click the ☰ icon in the browser).
  • Spark Core – The original hardware device used.
  • VoodooSpark Firmware – The firmware used on the Spark Core.
  • Johnny Five – The Node.JS lib to interact with Arduinos.
  • Spark-IO Node Package – Spark Core adapter for Johnny Five.
  • Sphero – A remote controlled, programmable, wireless sphere.
  • Cylon.js – A pretty badass project for controlling hardware with JavaScript.
  • Cylon-Sphero – A Cylon adapter to control Sphero.
  • Fritzing – Used to draw the Arduino diagrams.
  • NodeBots – For inspiration.

HTML Game: Are You Smarter Than Jen & Ian

jenian

Play Game | View Code

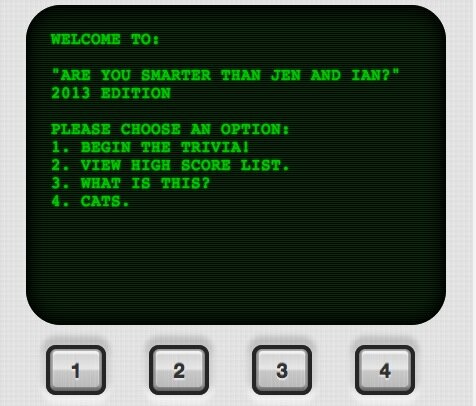
In July of 2013, my sister-in-law, Jen, got married. To celebrate the occasion, I thought it best to create another family oriented game to commemorate the occasion. Jen and her husband-to-be are well known smarty-pantses, so I figured a quiz game would be highly appropriate. It also gave me a chance to brush up on my responsive CSS, and put my first (and only) jQuery plugin – jQuery VintageTxt – to the test.

The result was fairly successful. The interface is just a vanilla vintageTxt window with a row of buttons below. A smattering of media queries resizes the window and buttons and adjusts the font size. The brushed metal buttons are styled with CSS3 and derived from Simurai’s codepen sample. The game logic basically stemmed from stringing together functions with the onEnterKey or onFinishedTyping callbacks in the vintageTxt plugin, or click handler callbacks from one of the four action buttons. The game logic is pretty much all in aystjai/js/main.js and the data for the questions are stored as vars in aystjai/js/questions.js.

At one point, I had all the question data loaded into Parse.com and was loading it all in via the Parse SDK. I can’t quite recall why I decided to pull everything offline. I still ended up using Parse.com to store high score data (viewable here). The Footable library is used to display the high score data in a nice, responsive table. Everything ended up looking pretty nice on phones and tablets. It was pretty fun to show off at various points throughout the wedding weekend.

Hats of to Jen and Ian as well!

Ghost Presentation from Memphis Tech Camp 2013

Intro – Just a Blogging Platform

Ghost is a new platform just for blogging. Think WordPress, but simpler and without the expectation that you can use it for a website, ecommerce, photo gallery, or generic CMS. The focus is completely on writing and publishing long form articles.

Ghost was actually conceived as a WordPress plugin to restructure the entire interface to focus only on writing and publishing, but the limitations were too great and a new platform was created from scratch. The new platform has simplicity and focus at its core.

It’s Easy

There are quite a few new tools out there for creating blogs that are free and feature rich, but often can be difficult to set up and use. Ghost is meant for hackers and ‘non-techies’ alike.

It’s Simple

Other blogging platforms attempt to give you every option under the sun. The core focus of Ghost will always be on blogging, not providing a ‘platform for the web’. Not trying to bash WordPress at all, just stating that Ghost has different goals.

“Feature rich” is great if it’s what you need, or if you are doing more than just writing and publishing, but can be overkill/overwhelming/confusing if not.

It’s Open Source

Ghost is an open source project and MIT licensed. You can fork it and create your own blogging platform project, or integrate it into your open source CRM.

It’s Non Profit

Honestly, this is probably one of the most intriguing aspects of the Ghost project. The Ghost Foundation was formed after a very successful Kickstarter campaign which raised over $300,000.

The Ghost Foundation will be the umbrella organization that promotes the continuing development of Ghost, and also runs the Ghost hosted service. All proceeds from the hosted platform go back to funding Ghost development, growing the hosting service, and growing the Ghost ecosystem and community.

Built on NodeJS

Where WordPress, Drupal and Joomla are all PHP based, Ghost is an app built completely with Javascript. This is very interesting from a technical standpoint, but the takeaway is that Ghost is attempting to future-proof itself by using JavaScript. JS has been around for 18 years, and is only getting more and more popular.

This has all sorts of wonderful and magnificent implications for developers, but creates a slight problem for regular folks who just want to write…

Ghost Hosting

Hosting is a bit of an issue right now. You can’t call Godaddy or HostGator and get a 1-click install for Ghost, like you can with PHP software. the Ghost Foundation is remedying this by offering their own hosting service which is currently in private beta (I have a site, it works just fine).

Other hosting companies have created their own options as well. They won’t be quite as easy as Ghost.org, but may offer some incentives depending on your needs.

Extending Ghost

Right now, Ghost has a pretty decent theme system that allows you to customize the layout and style of your blog. There are already a bunch of pre-made themes in the Ghost marketplace. Also, a few Ghost theme sites have popped up as well (including my own!).

The Future of Ghost

There is a new release coming out soon which adds tons of new features, and another release is planned for late December / early January. the Roadmap and progress is listed on the GitHub wiki.

Resources

The official Ghost forum is the best place to go for help. There are also other sites dedicated to installation and hosting, as well as themes and configuration. Of course, please feel free to ask me as well.

HTML5 Games Presentation for MemTech Super User Group

SlideshowShot

Slideshow | Code

Memphis flies under the radar as a technology hub, but there’s still a pretty active community of developers and other technologists that like to meet up and do stuff. I occasionally pop in on the PHP User Group, Ruby User Group, and Python User Group meetups when I get the chance. Every few months, the various user groups organize a joint meetup called the Super User Group Meetup and feature presentations on platform agnostic topics such as development tools, front-end development, processes, and whwatever else people want to talk about.

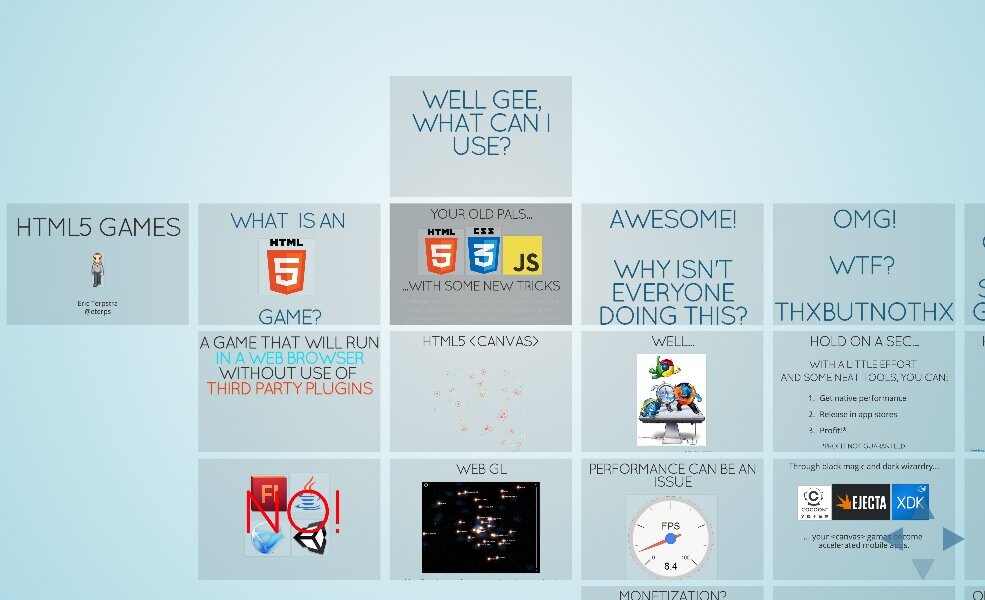
For the most recent meetup on June 20, 2013, I threw my name in the ring as a presenter and gave a talk about the what, where and how of HTML5 games. It’s nothing terribly complex or in-depth, just a brief survey of the general idea of developing games for the web using web based standards.

This was the first time I’d used the Reveal.js slideshow library. It was a pretty positive experience, especially with the help of slid.es to get started. Embedding live javascript is pretty boss. Also, there are a lot of great plugins, and I definitely took advantage of the ‘notes server’ so I could display the slides on once screen, and my notes on another. I’ll be using Reveal again in the future.

Live Updates in CodeIgniter with Socket.IO and Redis

CODE | DEMO*

UPDATE: This is the third of a three part series on CodeIgniter, Redis, and Socket.IO integration. Please be sure to read the other posts as well.
Part 1: A Sample CodeIgniter Application with Login And Session
Part 2: Use Redis instead of MySQL for CodeIgniter Session Data
Part 3: You are here.

Well here it is, folks, the moment I’ve been waiting for :) Real-time updates that actually work! Socket.IO has been integrated to work its magic alongside CodeIgniter. Now when a user is logged in, updates will tumble in like an avalanche with absolutely no refreshes or any user intervention at all! To catch up on what this is all about, be sure to check out A Sample CodeIgniter Application with Login And Session and Use Redis instead of MySQL for CodeIgniter Session Data before reading this.

Take a look at the video above to see the live updates in action. There are three different browser windows open (Chrome, Firefox, and IE9), each logged in with a different user. The top left browser is the Admin, which will get updated when any user posts a message. The Admin is also a member of team one, so when the admin posts a message, members of team one (bottom left) will see it. The browser on the right is team two, so she will not see anyone else’s posts, but the Admin will see what she posts.

* The demo may or may not be working depending on the state of my VPS. Most of my sample projects so far have been hosted on my shared hosting account, but due to the Redis and Node requirement I had to deploy this project to a VPS that I normally use for development and testing. If I am doing some development or testing, then Apache or Node or Redis might not be working properly – hence the video. Your best option really, is to download the code and try it yourself!

The Socket.IO library makes it painfully easy to work with NodeJS (aka, Node). Prior to this project I knew almost nothing about Node other than what had read in a few short books. I still don’t know much about Node, but I know that I like it and will continue to keep investigating it for future projects. One thing in particular that I think pretty cool in this project, is that all of the Node specific functionality (the real-time message updates) runs mostly parallel to the PHP application. So if Node decides to blow up, the application will still work, only without live updates.

Anyway, enough jibber jabber. Here’s the rundown on the changes to the application, and the highlights of the Socket.IO and Node code. Again, this is not meant to be a tutorial, but rather a show and tell and perhaps a nice piece of code for others to experiment with. Use at your own risk.

Installing Socket.IO

First things first: Install Socket.IO. I already had Node and NPM installed, but I needed a spot to create the node ‘server’ within my project. I created a folder in the project root called ‘nodejs’. Through the wonders of Node Package Management (NPM), I installed the socket.io package, as well as the node_redis package. This was done by simply navigating to the nodejs folder and running:

npm install socket.io
npm install redis

Yeah, that’s it. NPM will create a folder called ‘node_modules’ and download all the dependencies necessary to run the packages. After that I created the cisockServer.js file, and I was off to the races.

To get things working right away, I added code similar to the following, just to get things rolling. The first line instantiates Socket.IO and gets a Node server up and running on port 8080. An event handler is created for the ‘connection’ event, which fires whenever a Socket.IO client connects to the server. When this happens, Socket.IO will emit an event with an identifier of ‘startup’ and attach an object with a message. If the client is listening for the ‘startup’ event, it will receive the message.

var io = require('socket.io').listen(8080);

io.sockets.on('connection', function (socket) {
  // Let everyone know it's working
  socket.emit('startup', { message: 'I Am Working!!' });
});

To actually get the Node server fired up, it’s as easy as node --debug cisocketServer.js to get it going. I added the –debug option because I was using node-inspector for debugging and tracing. There is also an interesting project called Forever available from NodeJitsu that manages one or more Node processes. I use it on my VPS. It’s nice.

The Socket.IO Client

A server is all fine-and-dandy, but it won’t do much good without clients. I created a new javascript file in my CodeIgniter assets folder called ‘socket.js’ to hold all of my Socket.IO related client code. I wrapped most of the code in the MY_Socket namespace so it is more easily accessed by the javascript in main.js. The minimum amount of code needed to work with the server code above is what follows. It simply creates a socket connection, then listens for the ‘startup’ event from the socket connection. When the ‘startup’ event occurs, the attached message will be displayed on the console.

$(function(){

  window.MY_Socket = {

    // Instantiate the Socket.IO client and connect to the server
    socket : io.connect('http://localhost:8080'),

    // Set up the initial event handlers for the Socket.IO client
    bindEvents : function() {
      this.socket.on('startup',MY_Socket.startupMessage);
    },

    // This just indicates that a Socket.IO connection has begun.
    startupMessage : function(data) {
      console.log(data.message);
    }
  } // end window.MY_Socket

  // Start it up!
  MY_Socket.bindEvents();
});

To get this working, all that is needed are a couple more lines in header.php:


Now upon visiting the login screen (or any screen, really), the words, “I am working!” will appear in the console.

Joining A Room

Socket.IO has a concept called rooms, which is a nice way to segment broadcasted messages from a server so only a subset of users receive the message. In this application, users will join a room based on their team numbers. Team 1 will join room 1, and so on. The exception here are admins. Admin users can be on a team, but will receive messages from all users regardless of their team. To handle this, I created another room called ‘admin’.

The room joining process starts when a user is logged in. I added a bit of jQuery code to check the current page for team badges, and if any are found, run the joinRoom function. Another way to do this would be to just put a call to MY_Socket.joinRoom() at the top of /application/views/main.php so it runs whenever the main view is loaded.

init: function () {
  ...
  if($('.userTeamBadge').children().length > 0){
    MY_Socket.joinRoom();
  }
}

So the joinRoom function does some interesting things. First it grabs the cookie named, “ci_session” and reads the value. This value is the session ID set by CodeIgniter. This ID will be used to look up some of the other session information stored in Redis by the application’s MY_Session class. When the session ID is obtained, a ‘joinRoom’ event is emitted with the ID attached. If no session ID is found, then nothing happens. The code below is part of the client code in the socket.js file.

joinRoom : function(){
  // get the CodeIgniter sessionID from the cookie
  var sessionId = readCookie('ci_session');

  if(sessionId) {
    // Send the sessionID to the Node server in an effort to join a 'room'
    MY_Socket.socket.emit('joinRoom',sessionId);
  } else {
    // If no sessionID exists, don't try to join a room.
    console.log('No session id found. Broadcast disabled.');
    //forward to logout url?
  }
}

Socket.IO will be listening for the ‘joinRoom’ event on the server. When it hears the event, it will grab the session ID, use it to construct a string that matches the corresponding session key in the Redis database, and get the data associated with that key. The results returned from Redis will contain the rest of the user’s session information, including teamId and isAdmin (indicating if the user is or is not an admin). The result is parsed into a JSON, and the teamId and isAdmin values are used to join the appropriate ‘rooms’.

For any of this to work, a Redis client must be set up to execute Redis commands. The following code is in cisockServer.js.

// Start up a Node server with Socket.IO
var io = require('socket.io').listen(8080);

// Let Node know that you want to use Redis
var redis = require('redis');

// Listen for the client connection event
io.sockets.on('connection', function (socket) {
  // Instantiate a Redis client that can issue Redis commands.
  var rClient = redis.createClient();
 
  // Handle a request to join a room from the client
  // sessionId should match the Session ID assigned by CodeIgniter
  socket.on('joinRoom', function(sessionId){
    var parsedRes, team, isAdmin;

    // Use the redis client to get all session data for the user
    rClient.get('sessions:'+sessionId, function(err,res){
      console.log(res);
      parsedRes = JSON.parse(res);
      team = parsedRes.teamId;
      isAdmin = parsedRes.isAdmin;

      // Join a room that matches the user's teamId
      console.log('Joining room ' + team.toString());
      socket.join(team.toString());

      // Join the 'admin' room if user is an admin
      if (isAdmin) {
        console.log('Joining room for Admins');
        socket.join('admin');
      }
    });

  });
});

Excellent.

Send and Receive Messages

When a user posts a new message, the data is sent to the web server using jQuery’s Ajax function. This happens in the App.postMessage function in the main.js file. If the post is successful, a callback function – App.successfulPost – is executed. In order for the post to be successful, it needs to be processed by the CodeIgniter controller method responsible for saving posts to the database. This method – main.post_message – had to be refactored so that it would not only save the message, but also respond to jQuery’s ajax request with the message wrapped up in the HTML template so it can be sent out to other users.

The HTML template responsible for rendering each individual message was separated out into its own view and saved as /application/views/single_posts.php. It was basically just cut and pasted from the main view.


    echo $avatar ?>.png"
         alt=""
         data-title=" echo $teamId ?> echo $firstName ?> echo $lastName ?>"
         data-content=" echo $tagline ?>">


echo $body ?>


echo $createdDate ?>


In order to populate that template, CodeIgniter’s Loader.view method was used with the third parameter set to ‘true’ so it will return data instead of immediately rendering the view in the browser. The view is then loaded into the response data as a string, along with the user’s teamId value, and the HTML string that will be prepended to the user’s own message list. The following code is from /application/controller/main.php (the Main controller).

function post_message() {
  ... save message to db code ...

  if ( isset($saved) && $saved ) {
    // Gather up data to fill the message template
    $post_data = array();
    $post_data = $this->user_m->fill_session_data($post_data);
    $post_data['body'] = $saved['body'];
    $post_data['createdDate'] = $saved['createdDate'];

    // Create a message html partial from the 'single_post' template and $post_data
    $broadcastMessage = $this->load->view('single_post',$post_data,true);

    // Create an html snipped for the user's message table.
    $myMessage = "". $saved['body'] ."". $saved['createdDate'] ."";

    // Create some data to return to the client.
    $output = array('myMessage'=>$myMessage,
                    'broadcastMessage'=>$broadcastMessage,
                    'team'=>$post_data['teamId']);

    // Encode the data into JSON
    $this->output->set_content_type('application/json');
    $output = json_encode($output);

    // Send the data back to the client
    $this->output->set_output($output);
  }
}

The response object is sent back to the jQuery callback function, and it begins the process of broadcasting the message out to all the appropriate users. This really only takes one extra line of code in App.successfulPost.

successfulPost : function( result ) {
  ...
  // Send socket.io notification
  MY_Socket.sendNewPost( result.broadcastMessage, result.team );
}

All this does is send two pieces of information to the MY_Socket.sendNewPost function. The MY_Socket.sendNewPost function will simply take the message and teamId value and send it to the Node server by emitting a Socket.IO event.

sendNewPost : function(msg,team) {
  MY_Socket.socket.emit('newPost',msg,team);
}

When the ‘newPost’ event is handled on the server, it will relay the message to the appropriate team room, and also to the ‘admin’ room.

socket.on('newPost', function (post,team,sessionId) {
  console.log('Broadcasting a post to team: ' + team.toString());

  // Broadcast the message to the sender's team
  var broadcastData = {message: post, team: team};
  socket.broadcast.to(team.toString()).emit('broadcastNewPost',broadcastData);
 
  // Broadcast the message to all admins
  broadcastData.team = 'admin';
  socket.broadcast.to('admin').emit('broadcastNewPost',broadcastData);
});

The ‘broadcastNewPost’ event is emitted twice, and will therefore be handled twice by the client. This is not normally a problem, unless there is an admin with the same teamId as the sender. Then the admin will receive the message twice, and duplicate messages will be displayed on the screen. To correct this, a little logic prevents the message from being displayed twice. The message attached to the ‘broadcastData’ object is forwarded to the App.showBroadcastedMessage function.

// on 'broadcastNewPost' update the message list from other users
updateMessages : function(data) {
  // Because the message is broadcasted twice (once for the team, again for the admins)
  // we need to make sure it is only displayed once if the Admin is also on the same
  // team as the sender.
  if( ( !userIsAnAdmin() && data.team != 'admin') ||
      ( userIsAnAdmin() && data.team === 'admin') ){
    // Send the html partial with the new message over to the jQuery function that will display it.
    App.showBroadcastedMessage(data.message);
  }
}

When the App.showBroadcastedMessage function receives the message, it appends it to the top of the list of messages from other users using simple jQuery.

showBroadcastedMessage : function(messageData) {
   $(messageData).hide().prependTo(App.$otherMessages).slideDown('slow');
   //App.$otherMessages.prepend(messageData);
   App.setElements();
   App.setupComponents();
 }

Whew. That’s it! The journey is complete.

© 2018 Eric Terpstra

Theme by Anders NorénUp ↑