Tagjavascript

My First jQuery Plugin: VintageTxt

VintageTxt Default

DEMO | SOURCE

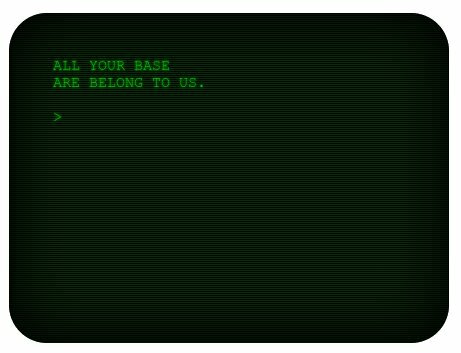
Ever hearken back to the good ol’ days of the Apple II, with its monochrome screen and visible scanlines? No? Me either, really. I don’t even know what hearken means. But I do know that vintage looking stuff is cool, and people love it when all that is old is new again. So here is a jQuery plugin (new) that injects a green monochromatic scanlined fake computer screen (old) right onto any webpage. You can even make it type out a bunch of text, one character at a time – like that stupid computer from Wargames. No annoying voice-over though. And of course there is an input prompt, so you can bang away at your keyboard while pretending to break through 8 levels of top secret encryption to re-route the protocols through the mainframe and unleash your most advanced viruses… all while chanting, “.”

Why make this? Fun, naturally. Plus I’ve been wondering lately what it would be like to make a jQuery plugin. I know I’m a little late to the jQuery party, and all the cool kids have move on bigger and better things, but the ability to whip up a jQuery plugin seems like one of those skills a self-respecting web developer should acquire at some point. Two helpful guides stocked the pot, and I threw in a bit of my own spicy sauce as I went along. I’m fairly satisfied with the end result, and the knowledge gained. To play around with a fully functional demo, click the link or image above. But to have some real fun, go grab the source from GitHub and VintageTxt your face off!

AngularJS SignIt! – Custom directives and form controls

Note: This is a companion post to Example CRUD App – Starring AngularJS, Backbone, Parse, StackMob and Yeoman. If you haven’t read that yet, please do so, otherwise this might not make much sense.

The most prominent feature, by far, of AngularJS SignIt! is the signature pad. It’s a fixed-size canvas that can be drawn upon with a mouse pointer or finger. The code for this wonderful widget is provided as a jQuery plugin by Thomas Bradley. There are a few more features for the signature pad than I use in this app, and I encourage you to check out the full documentation if you get a chance. It’s pretty great.

In order to implement the signature pad into my form, It must be a required field, and have the data included with the other fields when the form is submitted. The sig pad works by creating objects of x/y coordinates that correspond to marks on the canvas. When drawing on the pad, all that data gets set into a hidden form field. The data from that field is what needs to get into the Angular scope, and get validated by Angular’s form validation routine. Oh, and Angular somehow needs to fire the custom validation function built into the signature pad.

Luckily, this is the type of thing directives were built for. Custom directives let you create custom html tags that get parsed and rendered by Angular. So to start out, I created a custom directive called sigpad that is used by placing <sigpad></sigpad> in my HTML. The sigpad tag then gets replaced by the directive’s template HTML. The template for the HTML5 signature pad is just the default snippet taken directly from the signature pad documentation. See below:

<div class="control sigPad">
  <div class="sig sigWrapper">
    <canvas class="pad" width="436" height="120" ng-mouseup="updateModel()"></canvas>
  </div>
</div>

The logic for the directive is defined in a separate Angular module (see directives.js for full code). Take a look at the code below, and be sure to review Angular’s documentation on directives. The Angular docs give a great conceptual overview, but the examples are a bit lacking. I reviewed the docs many, many times, and still needed some help from the to get this working correctly (thanks P.B. Darwin!).

My biggest stumbling block was not using ngModelController, and instead trying to manipulate scope data directly. When working with a form, Angular provides all sorts of awesome code to work with data and do some validation. Basically, it all went down like this…

Insert the sigpad directive into the form with

<sigpad ng-model='user.signature' clearBtn=".clearButton" name="signature" required></sigpad>

Now Angular knows to replace the sigpad element with the template defined earlier. After this happens, Angular runs the linking function which contains all the logic for the directive. The little snippet shown below is in the linking function. It uses jQuery to select the template element (passed into the linking function as ‘element’) and runs the signaturePad function from the signature pad API. This is what creates the actual, drawable canvas.

var sigPadAPI = $(element).signaturePad({
                             drawOnly:true,
                             lineColour: '#FFF'
                           });

The ng-model=’user.signature’ bit is key. This is how data is shared between the signature pad and Angular. Also, go back up and look at the template. You will see ng-mouseup="updateModel() as an attribute of the canvas element. This tells Angular to run the updateModel() function when your mouse click ends on the signature pad. The updateModel() function is defined in the linking function of the sigpad directive.

When the updateModel() function is executed, it will wait for a split second so the signature pad can finish writing data to its hidden form field, then it will assign all that data to the Angular model value of the directive. Sounds confusing, and it is. The signature pad is off doing its own thing, completely oblivious to the fact that it is in an AngularJS app. It is Angular’s responsibility to grab data from the sigpad to get that data into its own scope. That is what $setViewValue is for. It hands the signature data over to Angular, so when the form is submitted, Angular has it available in scope.

Below is the entire directive for the drawable signature pad. You can see that it relies heavily on the signature pad API, but only after certain events handled by Angular have occurred.

.directive('sigpad', function($timeout){
  return {
    templateUrl: 'views/sigPad.html',   // Use a template in an external file
    restrict: 'E',                      // Must use <sigpad> element to invoke directive
    scope : true,                       // Create a new scope for the directive
    require: 'ngModel',                 // Require the ngModel controller for the linking function
    link: function (scope,element,attr,ctrl) {

      // Attach the Signature Pad plugin to the template and keep a reference to the signature pad as 'sigPadAPI'
      var sigPadAPI = $(element).signaturePad({
                                  drawOnly:true,
                                  lineColour: '#FFF'
                                });
     
      // Clear the canvas when the 'clear' button is clicked
      $(attr.clearbtn).on('click',function (e) {
        sigPadAPI.clearCanvas();
      });
     
      $(element).find('.pad').on('touchend',function (obj) {
        scope.updateModel();
      });

      // when the mouse is lifted from the canvas, set the signature pad data as the model value
      scope.updateModel = function() {
        $timeout(function() {
          ctrl.$setViewValue(sigPadAPI.getSignature());
        });
      };      
     
      // Render the signature data when the model has data. Otherwise clear the canvas.
      ctrl.$render = function() {
        if ( ctrl.$viewValue ) {
          sigPadAPI.regenerate(ctrl.$viewValue);
        } else {
          // This occurs when signatureData is set to null in the main controller
          sigPadAPI.clearCanvas();
        }
      };
     
      // Validate signature pad.
      // See http://docs.angularjs.org/guide/forms for more detail on how this works.
      ctrl.$parsers.unshift(function(viewValue) {
        if ( sigPadAPI.validateForm() ) {
          ctrl.$setValidity('sigpad', true);
          return viewValue;
        } else {
          ctrl.$setValidity('sigpad', false);
          return undefined;
        }
      });      
    }
  };
})

And what about the tiny signatures that show up in the signatories list? Also a custom directive. This one is smaller, but still tricky. The signature is displayed as an image on-screen, but a canvas element is still required to generate the signature from raw data before it can be converted to an image.

The directive is implemented with <regensigpad sigdata={{signed.get('signature')}}></regensigpad>. The ‘signed’ value is a single signature in the signature collection pulled from the back-end when the user picks a petition. the signature data from signed is passed into the directive scope using scope: {sigdata:'@'}.

When a list of signatures is retrieved, each signature record (including first & last name, email, and signature data) goes into a table row using ngRepeat. The regensigpad directive is executed for each row. The linking function will create a canvas element and make a displayOnly signature pad from it. The signature drawing is regenerated from the data, and then the canvas is converted to PNG format.

This PNG data is then used in the pic scope value, which is bound to the ng-src of an img tag. This img tag is the directive’s template, and will be inserted into the page. The full code for this directive is below.

.directive('regensigpad',function() {
  return {
    template: '<img ng-src="{{pic}}" />',
    restrict: 'E',
    scope: {sigdata:'@'},
    link: function (scope,element,attr,ctrl) {
      // When the sigdata attribute changes...
      attr.$observe('sigdata',function (val) {
        // ... create a blank canvas template and attach the signature pad plugin
        var sigPadAPI = $('<div class="sig sigWrapper"><canvas class="pad" width="436" height="120"></canvas></div>').signaturePad({
                          displayOnly: true
                        });
        // regenerate the signature onto the canvas
        sigPadAPI.regenerate(val);
        // convert the canvas to a PNG (Newer versions of Chrome, FF, and Safari only.)
        scope.pic = sigPadAPI.getSignatureImage();
      });
    }
  };
});

But that’s not all! You might have noticed that the select box holding the names of each petition looks kinda fancy, and allows you to type stuff to filter the list. This fancy form control is the select2 widget which is based of the Chosen library.

I didn’t have to write my own directive for it though. The Angular-UI project has already done the honors. Angular-UI is an open-source companion suite for AngularJS. It provides a whole pile of custom directives, and even a few extra filters. Many of the directives are wrappers for other widgets and open source projects, like CodeMirror, Google Maps, Twitter Bootstrap modal windows, and many more. It’s definitely worth looking into for any AngularJS project.
AngularJS SignIt! – Interchangeable Parse, StackMob and Backbone Services

Note: This is a companion post to Example CRUD App – Starring AngularJS, Backbone, Parse, StackMob and Yeoman. If you haven’t read that yet, please do so, otherwise this might not make much sense.

The AngularJS SignIt! application basically has three different interactions with a web service – fetch petitions, save a signature, and fetch a list of signatures based on the selected petition. That’s it – a get, a save, and a query. Initially, I was only using Parse.com to store data, so it was possible to include Parse specific objects and methods in my controller to save and get data.

But then I remembered I have a StackMob account just sitting around doing nothing, and thought I should put it to good use. So now I have two (slightly) different options to store my signatures. Rather than jumbling up my controller with code specific to StackMob and Parse, I created a module to abstract the Parse and StackMob APIs into their own services. These services could then hide any code specific to Parse or StacMob behind a common interface used by the controller.

With the back-end(s) abstracted, all the controller needs to worry about is calling saveSignature, getPetitions, and getSignatures. Below is a severely truncated version of the Main Controller that shows the three methods in use. Notice there is no mention of Parse or StackMob.

var MainCtrl = ngSignItApp.controller('MainCtrl', function($scope,DataService) {

  // GET A LIST OF SIGNATURES FOR A PETITION
  $scope.getSignatures = function getSignatures (petitionId) {
    DataService.getSignatures(petitionId,function (results) {
      $scope.$apply(function() {
        $scope.signatureList = results;
      });
    });
  };

  // SAVE A SIGNATURE
  $scope.saveSignature = function saveSignature() {  
    DataService.saveSignature($scope.user, function() { //user is an object with firstName, lastName, email and signature attributes.
      $scope.getSignatures($scope.select2); //select2 is the value from the petition dropdown
    });  
  };

  // GET ALL PETITIONS
  DataService.getPetitions(function (results) {
    $scope.$apply(function() {
      $scope.petitionCollection = results;
      $scope.petitions = results.models;
    });
  });

});

If you look closely, you’ll see that each service method is prefixed with DataService. This is the injectable that provides either the StackMob service, or Parse service to the controller. Each of those services has an implementation of the getSignatures, saveSignature, and getPetitions. Take a look:

angular.module('DataServices', [])
// PARSE SERVICE
.factory('ParseService', function(){
    Parse.initialize("<PLEASE USE YOUR OWN APP KEY>", "<PLEASE USE YOUR OWN API KEY>");
    var Signature = Parse.Object.extend("signature");
    var SignatureCollection = Parse.Collection.extend({ model: Signature });
    var Petition = Parse.Object.extend("petition");
    var PetitionCollection = Parse.Collection.extend({ model: Petition });

    var ParseService = {

      // GET ALL PETITIONS
      getPetitions : function getPetitions(callback) {
        var petitions = new PetitionCollection();
        petitions.fetch({
          success: function (results) {
              callback(petitions);
          }
        });
      },

      // SAVE A SIGNATURE
      saveSignature : function saveSignature(data, callback){
        var sig = new Signature();
        sig.save( data, {
                  success: function (obj) {callback(obj);}
        });
      },

      // GET A LIST OF SIGNATURES FOR A PETITION
      getSignatures : function getSignatures(petitionId, callback) {
        var query = new Parse.Query(Signature);
        query.equalTo("petitionId", petitionId);
        query.find({
          success: function (results) {
            callback(results);
          }
        });
      }
   
    };

    return ParseService;
})
// STACKMOB SERVICE
.factory('StackMobService', function(){
    // Init the StackMob API. This information is provided by the StackMob app dashboard
    StackMob.init({
      appName: "ngsignit",
      clientSubdomain: "<PLEASE USE YOUR OWN SUBDOMAIN>",
      publicKey: "<PLEASE USE YOUR OWN PUBLICKEY>",
      apiVersion: 0
    });

    var Signature = StackMob.Model.extend( {schemaName:"signature"} );
    var SignatureCollection = StackMob.Collection.extend( { model: Signature } );
    var Petition = StackMob.Model.extend( {schemaName:"petition"} );
    var PetitionCollection = StackMob.Collection.extend( { model: Petition } );

    var StackMobService = {
     
      getPetitions : function getPetitions(callback) {
        var petitions = new PetitionCollection();
        var q = new StackMob.Collection.Query();
        petitions.query(q, {
          success: function (results) {
              callback(petitions.add(results));
          },
          error: function ( results,error) {
              alert("Collection Error: " + error.message);
          }
        });        
      },    

      saveSignature : function saveSignature(data, callback){
        var sigToSave = new Signature();
        sigToSave.set({
          firstname: data.firstName,
          lastname: data.lastName,
          petitionid: data.petitionId,
          email: data.email,
          signature: JSON.stringify(data.signature) //Also, StackMob does not allow arrays of objects, so we need to stringify the signature data and save it to a 'String' data field.
        });

        // Then save, as usual.
        sigToSave.save({},{
          success: function(result) {
            callback(result);
          },
          error: function(obj, error) {
            alert("Error: " + error.message);
          }
        });
      },

      getSignatures : function getSignatures(petitionId, callback) {
        var signatures = new SignatureCollection();
        var q = new StackMob.Collection.Query();
        var signatureArray = [];

        q.equals('petitionid',petitionId);

        signatures.query(q,{
          success: function(collection) {
            collection.each(function(item) {
              item.set({
                signature: JSON.parse(item.get('signature')),
                firstName: item.get('firstname'),
                lastName: item.get('lastname')
              });
              signatureArray.push(item);
            });
            callback(signatureArray);
          }
        });
      }
   
    };
    // The factory function returns StackMobService, which is injected into controllers.
    return StackMobService;
})

This is an abridged version of the DataServices module. To see the full code, as well as many more comments explaining the code, head over to GitHub. The main point to observe here is that each service has slightly different code for getSignatures, getPetitions, and saveSignature. Also, each service has its own initialization code for its respective back-end service. The controller could care less though, because as long as the service methods accept and provide data in the right format, it’s happy.

But how does the controller know which service to use? Well, if you paid attention to the controller code, you’ll see that ‘DataService’ is injected, which is not defined yet. In the full code, there is a service defined all the way at the bottom of the file. It looks like this:

.factory('DataService', function (ParseService,StackMobService,BackboneService,$location) {
  var serviceToUse = BackboneService;
  if ( $location.absUrl().indexOf("stackmob") > 0 || $location.absUrl().indexOf("4567") > 0 ) serviceToUse = StackMobService;
  if ( $location.path() === '/parse' ) serviceToUse = ParseService;

  return serviceToUse;
});

All the other services (ParseService, StackMobService, and BackboneService) are injected into this service. In case you are wondering, BackboneService is yet another back-end service that can be used in place of the others – see the full code for details. The code above simply examines the URL and decides which service get injected via DataService. If ‘parse’ appears as the url path (e.g. www.example.com/app/#/parse), then ParseService is returned. StackMob requires that HTML apps be hosted on their servers, so just check the domain name for ‘stackmob’ and return the StackMob service. If neither of these conditions occur, then the BackboneService is returned, and no data is saved.

In retrospect, I think what I’ve got here is the beginnings of an OO-like interface – where a set of functions are defined to form a contract with the client ensuring their existence. And the implementations of that interface are a set of adapters (or is it proxies?). If I had to do this over, I would use a proper inheritance pattern with DataService as the abstract parent, and the other services as the implementations or subclasses. One of these days I’ll get around to refactoring. One day…

Full Source: https://github.com/ericterpstra/ngSignIt

Example CRUD App – Starring AngularJS, Backbone, Parse, StackMob and Yeoman

AngularJS SignIt!

After finishing my first experimental project in AngularJS, I wanted to try saving data, rather than just retrieving it. Angular has some great mechanisms for creating forms, so I put together a small application to test out more of what Angular has to offer. Oh, and I also wanted to build this using Yeoman. More on that in a minute.

The app I ended up with is a petition signer. A user chooses a petition from the select-box, enters a first name, last name and email into the form, and then signs the signature pad either by drawing with the mouse, or using a finger on a touchscreen. Hitting the Save button will capture the information, and add it to the list of signatories for the selected petition. Pretty simple, no?

The really fun part comes when the data is saved. Depending on the url, the application will choose a place to save the data. If ‘parse’ shows up in the url path, then Parse.com is used as the back-end. If the application is hosted on StackMob’s server, then data is stored with StackMob.com. If neither of these things occur, then data is just saved to a temporary Backbone collection and cleared out when you refresh the page.

Try it out!

Please note that a modern browser is needed. This will not work on IE8 or lower. I have only tested it in the latest Chrome, Firefox 15, and Safari on iOS 5. YMMV with other browsers. If I find the time, I’ll add in the fixes for IE later on.

Get the Code: https://github.com/ericterpstra/ngSignIt

A few more things…

Aside from AngularJS, Parse, and StackMob, I threw in plenty of other nifty libraries and snippets to get this thing working and looking (kinda) nice.

  • The select2 component, wrapped in a directive provided by Angular-UI. Angular-UI is a great add-on library for AngularJS that provides some neat widgets and additional functionality to directives.
  • HTML5 SignaturePad jQuery plugin from Thomas Bradley.
  • responsive stylesheet (try it on mobile!)
  • A font-face generated from fontsquirrel.com using Estrya’s Handwriting font.
  • Stack of paper CSS3 snippet from CSS-Tricks.com

And, of course, Yeoman was involved. There is tons of functionality built into Yeoman for handling unit-tests, live compilation of SASS and CoffeeScript, dependency management, and other stuff. I basically just used it for it’s AngularJS scaffolding, and to download some libraries via Bower. It went something like this:

yeoman init angular ngSignIt
cd ngSignIt
yeoman install jquery
yeoman install json2
... etc ...

Then I went about building my application as usual. Upon completion, I ran

yeoman build

to package everything that is needed into the ‘dist’ folder, and plopped that on my web server. Done.

// TODO

In upcoming blog posts, I’ll go over some of the more interesting bits of code – namely the services module and custom directives. There are a fair number of comments in the code now, but I think a higher-level overview would add some value. Stay tuned.

UPDATE!

Here are the links to the follow-up articles:

Sieve of Eratosthenes Visualized in Real Time with Python

Spoiler Alert! This article reveals the answer to Project Euler problem #10.


Try it!

A few months ago I worked through the first 10 problems of Project Euler. I did OK up to problem #10. The question involved finding all the prime numbers up to 2,000,001. There were earlier questions that involved finding primes, and I cobbled together some javascript with the help of underscore.js that got the job done – albiet very slowly. My homespun solution was just too durn slow for problem #10. I turned to the internet, and it provided me a blazing fast solution. See below.

var ten = function sieve(max) {
    var D = [],
        primes = [],
        sum = 0;
    for (var q=2; q < max; q++) {
    if (D[q]) {
      for (var i=0; i < D[q].length; i++) {
        var p = D[q][i];
               
        if (D[p+q])
           D[p+q].push(p);
        else
           D[p+q]=[p];
      }
      delete D[q];
    } else {
            sum += q;
      primes.push(q);
      if (q*q<max)
         D[q*q]=[q];
    }
  }
  return sum;
 }(2000001);

So yeah, I cheated. At the time, I had no idea how this code worked, I just knew that it did. Since then, I’ve occasionally revisited this code to take another shot at figuring out what this mysterious D array is doing with its Ps and Qs. However, trace after trace and many breakpoints later I was still scratching my head.

But just yesterday I stumbled across Python Tutor. This site is simply amazing. These geniuses have developed an interactive online code editor that spits out pictures based on what your code is doing. You even get little playhead controls to step through each line! This wizardry finally allowed me to scratch the itch that’s been bugging me for a while.

I returned to the site where I ‘borrowed’ the JavaScript algorithm for the Sieve of E., and found the Python equivalent. The syntax is a bit different, but it essentially doing the same thing. The code looks like this:

def eratosthenes(maxnum):
   D = {}  # map composite integers to primes witnessing their compositeness
   q = 2   # first integer to test for primality
   while q <= maxnum:
       if q not in D:
           yield q       # not marked composite, must be prime
           D[q*q] = [q]  # first multiple of q not already marked
       else:
           for p in D[q]:  # move each witness to its next multiple
               D.setdefault(p+q,[]).append(p)
           del D[q]        # no longer need D[q], free memory
       q += 1

for p in eratosthenes(19): print p

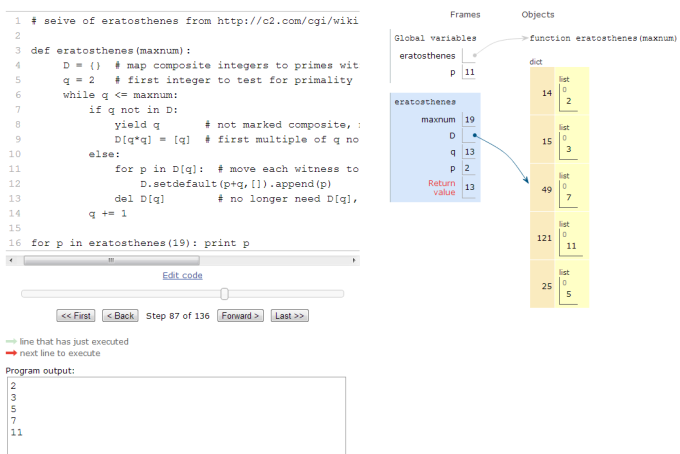
The comments were helpful in determining that it was doing the same thing as the JS algorithm, but when I plugged this code into Python Tutor, WHAMMO! It hit me like a ton of bricks. D is a dictionary!!! D is where non-prime numbers are stored and created from prime factors.

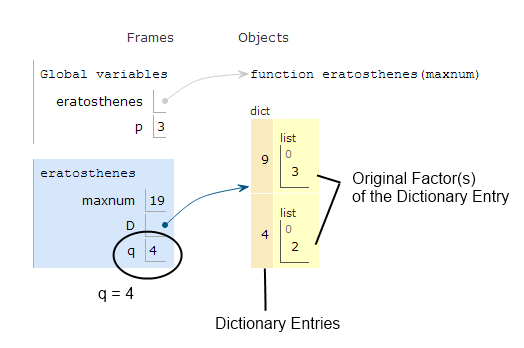
So we iterate over all the numbers from 1 to whatever, with q as the iterator index. For each value of q, check the dictionary (D). If that value does not exist in D, then the number is prime. For each prime number, find the square and store it in the dictionary for later. So when q = 2, the first entry in D is 4. Then when q = 3, stick 9 in the dictionary. Also, for each dictionary entry created by squaring a prime, attach that prime as a child object.

When q is not prime, examine the dictionary entry. Take the child, add it to the dictionary value, and create a new entry in the dictionary for the sum. So when q = 4, its child value is 2. Take 2 + 4 and get 6. Create a dictionary entry for 6, and store the original prime factor (2) as its child. Then delete the previous dictionary entry (4). Keep this up until q is larger than your target value (2000001).

This part took me the longest to figure out, and it makes a lot more sense by skipping the deletion part. In the Python Tutor example, comment out the line del D[q]. When running the visualizer, the dictionary keeps growing and it is much easier to see how each entry is created, and why each entry is composite rather than prime. For each square value, its root is added over and over again until q reaches its limit. Deleting dictionary entries is not absolutely necessary with low values of q. It’s a memory saver that keeps D from getting out of hand (and crashing Chrome when trying this in JavaScript).

I know I did a sub-par job of explaining this, but seriously, that’s what Python Tutor is for. Try it, you’ll like it.

Install Yeoman and all its dependencies in Ubuntu Linux

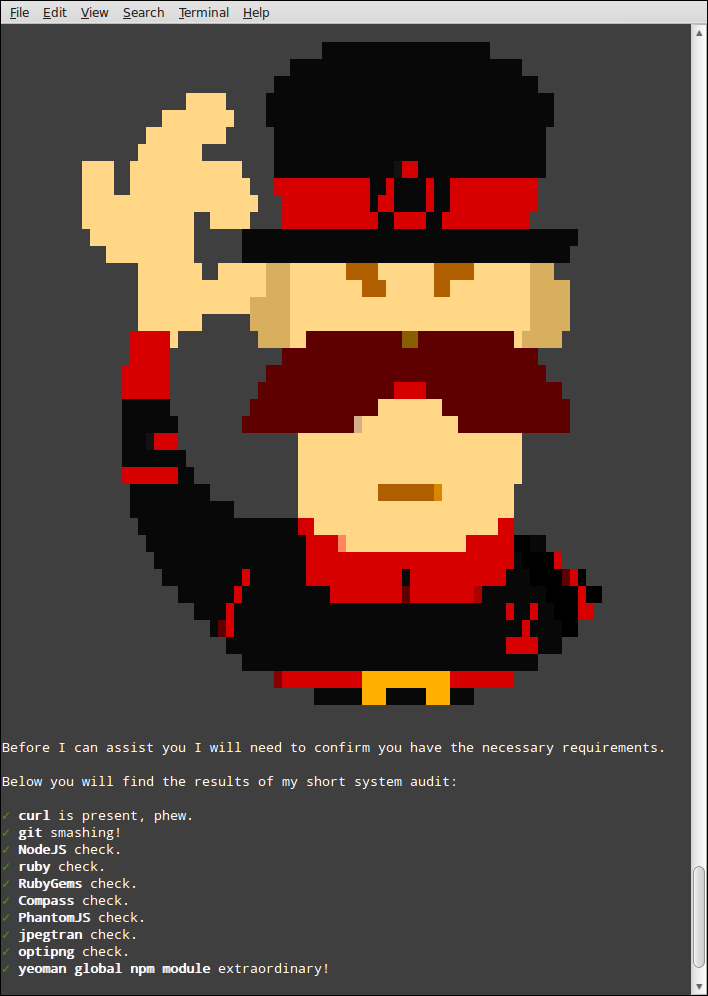
Yeoman is awesome, but holy jeez are there a lot of requirements to get it fired up for the first time. Listed below are all the commands I typed in to get every last Yeoman dependency installed. I did this on 64-bit Ubuntu. For 32-bit, you’ll need to download a different version of PhantomJS, but otherwise I’m pretty sure everything else works the same.

CURL

sudo apt-get update
sudo apt-get install curl

GIT

reference: http://evgeny-goldin.com/blog/3-ways-install-git-linux-ubuntu/

sudo apt-get install libcurl4-gnutls-dev libexpat1-dev gettext libz-dev libssl-dev
wget --no-check-certificate https://github.com/git/git/tarball/v1.7.12.2
tar -xvf v1.7.12.2
cd git-git-04043f4/
make prefix=/usr/local all
sudo make prefix=/usr/local install
git --version
rm -rRf git-git-04043f4
rm v1.7.12.2

NodeJS

reference: https://github.com/joyent/node/wiki/Installation

sudo apt-get install python-software-properties
sudo add-apt-repository ppa:chris-lea/node.js
sudo apt-get update
sudo apt-get install nodejs npm

RVM + Ruby 1.9.3

reference: http://ryanbigg.com/2010/12/ubuntu-ruby-rvm-rails-and-you/
You might want to grab a coffee. This is a long one.

sudo apt-get install build-essential
curl -L get.rvm.io | bash -s stable
echo '[[ -s "$HOME/.rvm/scripts/rvm" ]] && source "$HOME/.rvm/scripts/rvm"' >> ~/.bashrc
. ~/.bashrc
sudo apt-get install build-essential openssl libreadline6 libreadline6-dev curl git-core zlib1g zlib1g-dev libssl-dev libyaml-dev libsqlite3-dev sqlite3 libxml2-dev libxslt-dev autoconf libc6-dev ncurses-dev automake libtool bison subversion
rvm install 1.9.3
rvm use 1.9.3
rvm --default use 1.9.3-p194
ruby -v

Compass

reference: http://compass-style.org/install/

gem update --system
gem install compass

PhantomJS

Using apt-get will get you v. 1.4.0. The method below gets the latest version. For 32-bit, just remove ‘_64’ from each command.
reference: http://devblog.hedtek.com/2012/04/phantomjs-on-ubuntu.html

cd ~/
wget http://phantomjs.googlecode.com/files/phantomjs-1.7.0-linux-x86_64.tar.bz2
tar -xvf
cd /usr/local/share
sudo tar xvf ~/phantomjs-1.7.0-linux-x86_64.tar.bz2
sudo ln -s /usr/local/share/phantomjs-1.7.0-linux-x86_64/ /usr/local/share/phantomjs
sudo ln -s /usr/local/share/phantomjs/bin/phantomjs /usr/local/bin/phantomjs
phantomjs --version
rm ~/phantomjs-1.7.0-linux-x86_64.tar.bz2

JPEGTRAN / OptiPNG

sudo apt-get install libjpeg-turbo-progs
sudo apt-get install optipng

YEOMAN!!!

(finally!)

sudo npm install -g yo grunt-cli bower

And we’re done.

Angular Cats! An AngularJS Adventure Anthology

Over the past couple weeks I’ve been teaching myself about the AngularJS javascript framework. It’s gone pretty well so far, and I think I have a pretty decent handle on the basics. I’ve been able to use the tools provided to put together a small application that uses the Petfinder.com API as a backend. It is a remake of an old Flex application I built in 2009 for the House of Mews pet shelter in Memphis, TN. The application allows the user to browse pictures and information on all the adoptable cats currently at the shelter. See the application in context at www.houseofmews.com (and please excuse the background music). You can also view the app by itself here.

In addition to remaking the old app, I took the remodeling a few steps further in order to try out a few more AngularJS features. The newer version of application stands on its own and has a few added features – most notably, deep linking.

While working on this, I created a series of blog posts to chronicle my progress (and show off). There are five posts in total, with the first three focused on the ‘remake’ app, and the last two posts detailing parts of the ‘remodeled’ app. If you are interested in learning AngularJS for yourself, definitely pay attention to the latter posts. The first three posts are choc full of newbie mistakes and bad practices. They are a great example of how not to build an Angular application.

All of the code is available on GitHub. I’ve already tweaked the code a bit, so it may not match 1:1 with the code pasted into the blog posts, but everything is commented and should be relatively easy to follow. Anyway, thanks for paying attention! Enjoy!

Parts 1 – 3: House of Mews redux (source: ngCatsHOM)

Parts 4 & 5: Angular Cats! (source: ngCats)

Angular Cats! Part 5 – Custom Directive

One more thing…

I took the liberty of making a custom directive out of the Twitter Bootstrap Carousel widget. You’ll see it in partials/catDeatil.html as . I’m not 100% certain I’m doing things the ‘correct angular way’, but it seems to work.

Demo | Code

The catCarousel.html partial:

<!-- The ngCarousel directive gets inserted here to fix a timing error between angularjs and bootstrap -->
<div id="myCarousel" class="carousel slide">
  <!-- Carousel items -->
  <div class="carousel-inner">
    <!-- Give the first item in the collection the 'active' class -->
    <div ng-class="{item:true, active:$first}" ng-repeat="photo in pics">
      <img ng-src="{{photo}}">
    </div>
  </div>
  <!-- Carousel Arrow Buttons -->
  <a class="carousel-control left" href="#myCarousel" data-slide="prev">&lsaquo;</a>
  <a class="carousel-control right" href="#myCarousel" data-slide="next">&rsaquo;</a>
</div>

The directive code:

The templateURL property specifies the HTML to insert into the directive tag. I’ve restricted the type of directive to an element name. It’s just easy that way. One caveat though, it that special considerations need to be made for this to be IE7/8 compatable.

The link function will take the value of the ‘pics’ attribute in the catcarousel HTML tag and assign it to the directive scope. Whenever the ‘cat’ object changes – either by clicking Next/Prev, or selecting a cat from the grid – the directive will update the ‘pics’ and call the carousel() function on the root element of the directive template.

angular.module('myDirectives', [])
.directive('catcarousel', function(){
  return {
    templateUrl: 'partials/catCarousel.html',
    restrict: 'EAC',
    link: function (scope,element,attr) {
      scope.$watch('cat', function () {
        scope.pics = scope.$eval(attr.pics);
        $(element).carousel({
          interval: 0
        });
      });
    }
  }
});

And that just about wraps it up. There’s plenty more code in the cat apps than outlined in these blog posts, so if anyone is interested, please take a look at the project on GitHub. I tried to add as many useful comments as I could. If any Angular experts run across this and are horrified by any of the code, please let me know! Thanks. Bye.

Angular Cats! Part 4 (Refactored) – Deep Linking, More Better Services

Demo | Code

During the creation of Angular Cats!, it didn’t take me long to realize that I was straying from best practices and the intentions of Angular’s creators. I dug myself a bit of technical debt in the name of expediency, and have now come to pay the piper. Over the past few days I’ve been refactoring major portions of the app, and wound up with almost an entirely new codebase. Large sections are still intact (e.g. the translator service), and functionality is basically the same, but a few key differences are present.

The largest change by far is the ability to deep link. Every cat has its own URL, and can be bookmarked.

To get the deep-link ball rolling, the following code was added to app.js:

.config(['$routeProvider', function($routeProvider) {
    $routeProvider.when('/cats/:page', {templateUrl: 'partials/catList.html', controller: CatListController});
    $routeProvider.when('/cat/:catId/:page', {templateUrl: 'partials/catDetail.html', controller: CatDetailController});
    $routeProvider.otherwise({redirectTo: '/cats/1'});
}])

The routes allow a user to go to a specific ‘page’ of cats in the cat list, or navigate to the details of any given cat – provided you know its ID. I also store the page number in the URL of the cat detail page so the user can navigate back to the page previously viewed when clicking ‘Back’ on the cat detail page.

In order to navigate around the application, the controllers now use the $location module, and will change the path according to the behavior of the user. The code below shows how the handler for clicking a cat to view details has changed.

Before (use events to change state):

// CatListController
$scope.getDetail = function() {
  eventBroadcast.broadcast('catClicked',{cat:this.cat});
};

//MainController
$scope.$on('catClicked',function() {
  switchView();
});
...
function switchView() {
  $scope.viewList = !$scope.viewList;
  $scope.viewDetail = !$scope.viewDetail;
}

After (use location to change state):

// CatListController
$scope.getDetail = function (catId) {
  $location.path('/cat/' + catId + "/" + $routeParams.page);
};

The CatsService module was completely overhauled to include a getCat() method in addition to getCats(), along with a few other useful methods. Oh, and this version actually has the ability to contact the live Petfinder.com API! Using a config constant, the app can switch between grabbing cat data from a .json file on disk, or reaching out to the live Petfinder API (via a PHP proxy on my own server). While building the app, I usually relied on a static json file for data, but it’s nice to be able to contact a live service to return fresh data.

The returned data is also stored in the CatService module. This data is basically the catCollection property that I previously stuck in $rootScope. Storing application data and state information on $rootScope just didn’t seem right, so I created some properties and accessor methods (get/set) on CatService, and used that instead. Worked out quite nicely.

Below is the new CatService module. Notice that it’s quite a bit larger that the previous module. This time around, the service had a few private variables and functions that the service uses for itself, and the CatService object is returned by the factory and injected into the controllers. The properties of the CatService object are exposed to the controllers and can be used wherever CatService is injected.

The first major feature of this updated service is the remoteSvc resource. Instead of just grabbing a .json file from disk, it will contact the proxy.php service and grab live data returned from the Petfinder API. The query object passed into the $resource function demonstrates how to override default $resource methods. This really isn’t necessary in my case, but I did it just for kicks.

The line var service = (ENDPOINT === "LOCAL") ? localSvc : remoteSvc; will look at the ‘ENDPOINT’ constant set in the application config (see app.js), and determine whether to use the local json file, or server resource to gather the cat data. It’s a quick and dirty approach, and in a larger system it would be better to abstract this into a proper config file, with two separate service modules, but it works pretty well for a small app with one or two services.

The CatService object has some getters and setters for accessing the selected cat, and the selected cat’s index value in the cat collection array. And, of course, there are the getCats and getCat methods, which gather the necessary data for the list and detail views (respectively).

angular.module('catService', ['ngResource','CatServiceHelper'])
.factory('CatsService', function($resource,$filter,$routeParams,CatServiceHelper,ENDPOINT){
    /**
     * Private vars
     */

    // Set the max number of cats to retrieve from the Petfinder API
    var numberOfCatsToGet = 200;

    // Set up the $resource injectable to use the Petfinder API. Some custom options are used in the $resource.query method
    var remoteSvc = $resource('/jsCats/ngCats/proxy.php', {count:numberOfCatsToGet,offset:0},
                { query: {
                      method:'GET',
                      params:{action:'shelter.getPets',count:numberOfCatsToGet, offset:0},
                      isArray:true
                     }
                });

    // Use the cats.json file as the $resource, if necessary
    var localSvc = $resource('cats.json',{});

    // Decide which $resource to use as the actual service
    var service = (ENDPOINT === "LOCAL") ? localSvc : remoteSvc;

    // Private properties & methods used to store data shared between controllers
    var _cats = [];
    var _activeCatIndex = -1;
    var _setActiveCat = function _setActiveCat(catId,callback) {
                          var cat = CatsService.findCatInCollection(catId);
                          if (cat) {
                            _activeCatIndex = _cats.indexOf(cat);
                            callback(cat);
                          }
                        };

    /**
     * CatService Object returned by the factory function.
     * Contains instance methods that can be used by the controllers.
     */

    var CatsService = {
     
      /**
       * ### Accessor Methods
       */
     
     
      // Controllers can read the cat collection, but cannot change it without calling a service method.
      getCatCollection : function getCatCollection() {
        return _cats;
      },

      getActiveCatIndex : function getActiveCatIndex() {
        return _activeCatIndex;
      },

      setActiveCatIndex : function setActiveCatIndex(idx) {
        if (angular.isNumber(idx) && idx <= _cats.length) {
          _activeCatIndex = idx;
        } else {
          _activeCatIndex = -1;
          throw("activeCatIndex must be a number, and cannot exceed the length of the cat collection.");
        }
      },

      /**
       * ### Service Methods
       */


      // This method retrieves all cat data from the service and stores it in _cats
      getCats : function getCats(callback){
        var self = this;
        service.query(function (data) {
          var rawCatData = [];
          if ( data && data.length > 0 && data[1].petfinder.pets.pet && data[1].petfinder.pets.pet.length > 0 ) {
            rawCatData = data[1].petfinder.pets.pet;
          }
          angular.forEach(rawCatData,function(item){
            _cats.push( CatServiceHelper.translateCat(item) );
          });
          if (angular.isFunction(callback)) callback(_cats);
        });
      },

      // This method retrieves data for one cat.  It will also call getCats if the user
      // navigates directly to a catDetail page. This is necessary for the Back and
      // Next/Prev buttons to work correctly.
      getCat : function(catId, callback) {
        var self = this;
        if( _cats.length ) {
          _setActiveCat(catId,callback);
        } else {
          this.getCats(function (results) {
              _setActiveCat(catId,callback);
          });
        }
      },

      // This uses an AngularJS filter function to extract a cat from the cat collection by the cat's id
      findCatInCollection : function findCatInCollection(catId) {
        var cat = $filter('filter')(_cats, function (item) {
                return item.id.toString() === catId;
              });
        return cat[0] || 0;
      },

      // Use the default $resource.query method
      query : service.query,
     
      // Use the default $resource.get method
      get : service.get
   
    };

    // The factory function returns CatsService, which is injected into controllers.
    return CatsService;
});

Angular Cats! Part 3 – Communicating with $broadcast

Continued from: Angular Cats! Part 2
Full Source Code: GitHub: jsCats/ngCatsHOM

In part 2 of this post, the source code in the event handlers within each controller was removed. That’s because there’s some interesting stuff going on that wouldn’t have made sense without first knowing about one last module within the application: eventBroadcast.

To communicate clicks and cats between controllers, I found a dead simple solution that cobbles together an event dispatcher-esque system. When ‘eventBroadcast’ is injected into a controller, it will have access to its member variables – in this case, an event name, and a message. The eventBroadcast object can also broadcast events from the $rootScope, which will then trickle down the scope hierarchy and can be listened for by each controllers $scope. So it goes something like this:

  1. User clicks a cat thumbnail
  2. $scope.getDetail is called.
  3. The clicked cat object is attached to eventBroadcast.message.
  4. An event is broadcast from $rootScope with the name ‘catClicked’
  5. CatDetailController’s $scope responds to ‘catClicked’
  6. eventBroadcast.message is checked for data.

Here is the ngClick handler in CatListController:

function CatListController($scope,$rootScope,$routeParams,CatsService,$location,eventBroadcast) {

  $scope.getDetail = function() {
    // When a thumbnail is clicked, a 'catClicked' event is broadcast,
    // and the data for the clicked cat is attached to eventBroadcaster
    eventBroadcast.broadcast('catClicked',{cat:this.cat});
  };

...
}

Here is the actual eventBroadcast module:

.factory('eventBroadcast', function($rootScope) {
    // eventBroadcaster is the object created by the factory method.
    var eventBroadcaster = {};

    // The message is a string or object to carry data with the event.
    eventBroadcaster.message = '';

    // The event name is a string used to define event types.
    eventBroadcaster.eventName = '';

    // This method is called from within a controller to define an event and attach data to the eventBroadcaster object.
    eventBroadcaster.broadcast = function(evName, msg) {
        this.message = msg;
        this.eventName = evName;
        this.broadcastItem();
    };

    // This method broadcasts an event with the specified name.
    eventBroadcaster.broadcastItem = function() {
        $rootScope.$broadcast(this.eventName);
    };

    return eventBroadcaster; })

And the handler for ‘catClicked’ in CatDetailController:

function CatDetailController($scope,$rootScope,eventBroadcast) {

  // When 'catClicked' is broadcast, we know that new cat data needs to be loaded from eventBroadcast
  $scope.$on('catClicked',function() {
    showCat(eventBroadcast.message.cat);
  });

  ...

  var showCat = function(cat) {
    $scope.cat = cat;
    $scope.catIndex = $rootScope.catCollection.indexOf(cat);
  }

}

And there you have it! A rudamentary technique for communicating between controllers. However, after reading , I learned that there are some flaws with this method. Thomas Burleson created a more robust pub/sub module that acts as a message queue, which is more scalable, flexible, and doesn’t rely so much on $rootScope. A demo of the Messaging Service module is on jsFiddle, and the code can be download from his site. I hope to try this out very soon.

© 2017 Eric Terpstra

Theme by Anders NorénUp ↑