Tagrequirejs

Phaser Starter Project for WebStorm and Chrome: Modular TypeScript, Code Completion, and Live Debugging

Game in Action

DEMO | CODE

Getting started with TypeScript and Phaser on OSX and Ubuntu has been a tricky proposition. My requirements for a development environment were as follows:

  • Use TypeScript as the primary language
  • Break the project into small files – preferably one module or class per file
  • Have all the benefits of TypeScript utilized by my IDE, namely code completion, error checking, and documentation for function signatures
  • File watchers that generate javascript and source maps on file save
  • Live debugging of TypeScript files

Thanks to the latest WebStorm (6.0.2 v129.541 as of this writing), Require.js, and Chrome DevTools, I have a great development environment set up to create Phaser games on OSX and Linux. Here’s how I did it:

First, grab the starter project from my GitHub account (thanks to Jesse Freeman for the inspiration).

git clone git@github.com:ericterpstra/phaser-webstorm-template.git

Then get the following four files from the Phaser ‘build’ folder:

  • phaser.js or phaser.min.js
  • phaser.d.ts
  • phaser-fx.js or phaser-fx.min.js
  • phaser-fx.d.ts

Copy those files to /phaser-webstorm-template/lib/

Then download require.js and put it in the same lib folder.
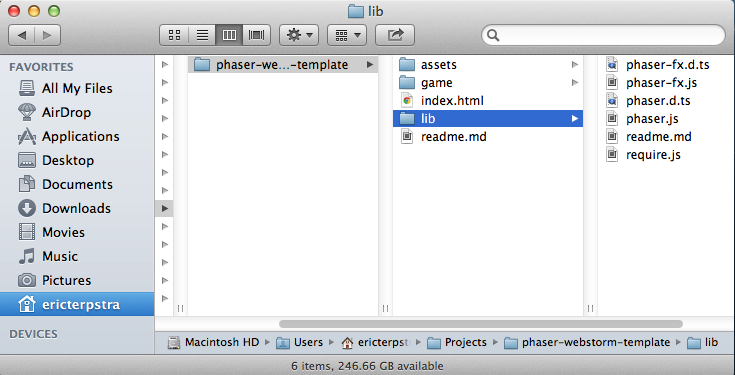
The contents of the lib folder

The contents of the lib folder

Now start WebStorm 6 (get the EAP version here). Close the existing project if it is open, and go to the welcome screen. Choose Create New Project from Existing Files. Then choose Source files are in a local directory, no Web server is yet configured and click Next.

A file selection window should appear. Find the phaser-webstorm-template folder, select it, and click the Project Root button. Then click Finish.

Find the phaser folder and make it the project root.

Find the phaser folder and make it the project root.

When the project finishes loading, open game/game.ts. After a few seconds, WebStorm should prompt you to add a ‘TypeScript’ file watcher. Click the Add Watcher link.

Click 'Add Watcher' when prompted.

Click ‘Add Watcher’ when prompted.

Once the watcher is added, go the the Webstorm menu (File menu in Linux) and open Preferences…. Click File Watchers under the Project Settings section, and double click the TypeScript entry. When the Edit Watcher window appears, add the following text to the Arguments: field:

 --target es5 --module amd
Edit the File Watcher settings.

Edit the File Watcher settings.

Click OK and return to the code editor. Open game/objects/Player.ts and also game/game.ts if it is not open already. Manually save both files to trigger the file watcher and regenerate the javascript and source map for each file. If this was successfull, the .js and .js.map files will appear underneath their respective .ts files, and can be viewed by clicking the expand arrow (see screenshot below).

Files

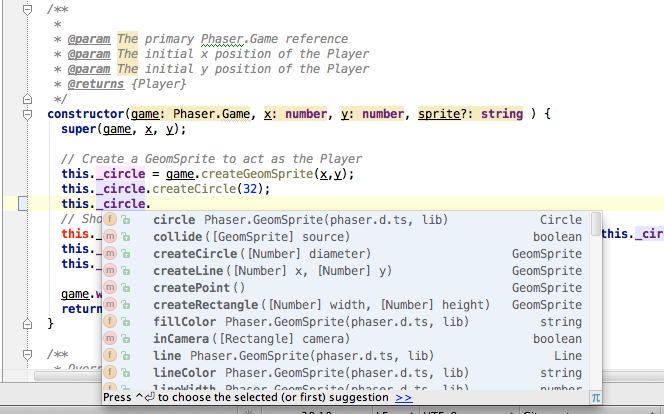
You should now be able to use WebStorm and have lots of assistance for TypeScript. Code completion, method signatures, documentation, error reporting, and all the other benefits of WebStorm should now be available.

Code hinting should be working in .ts files.

Code hinting should be working in .ts files.

For live debugging of code, open Google Chrome and point it to http://localhost:63342/phaser-webstorm-template/index.html and open the Chrome DevTools (Cmd-Alt-i on OSX, F12 on Linux). Click the Settings button (the little gear icon in the bottom-right corner of the DevTools window). Check the box next to Enable source maps in the General section.

Enable source maps.

Enable source maps.

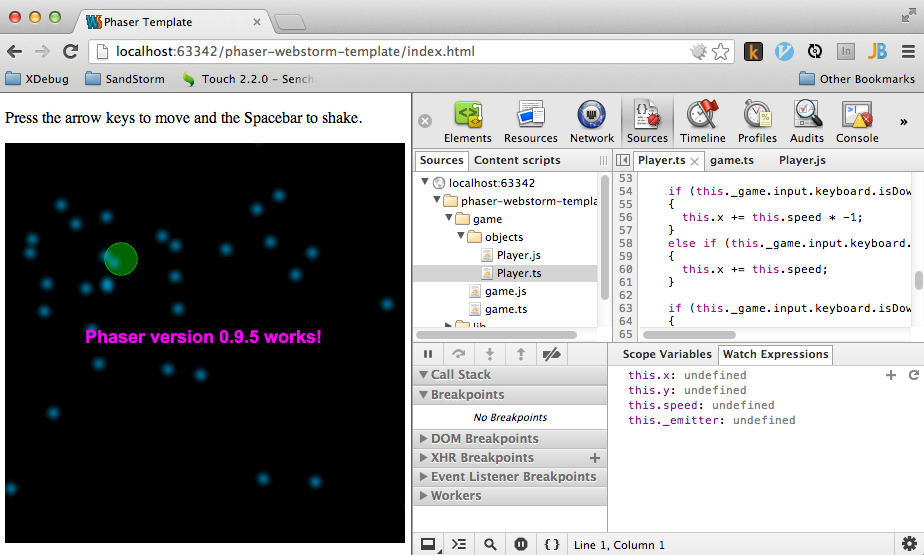
Now, from the Sources tab, you should be able to open the Player.ts and game.ts files and set breakpoints and watch expressions and step through the code one line at a time! Awesome, right?

Chrome Debugging

That’s basically it. WebStorm apparently has TypeScript debugging built in as well, but I’ve had trouble getting it to work reliably. Once I do, I’ll update this post with info on live debugging from within WebStorm as well. Also in the works is a screencast and more in-depth explanation of the actual code within the project itself. Stay tuned.

Special thanks to Photon Storm for the Phaser framework, Jesse Freeman for the original Phaser project template, and for help debugging my modular TypeScript.
A simple require.js setup (with canvas and Hammer.js)

I have been reading a few tutorials on HTML5’s canvas tag, and decided to give it a whirl. Rather than bunch everything together in a huge javascript file, like most of the examples I read, I wanted to split files into sensible chunks of code. The RequireJS project has crossed my path on more than one occasion, so I figured it might be a good thing to try. I figured correctly, as it was super easy to set up, and works swimmingly.

There are plenty of great resources out there to learn all about modular javascript, as well as an interesting debate on the proper method of defining modules, but the RequireJS site itself has enough info to get a basic project off the ground. I had to do a bit of experimenting on my own to clear things up in my head, and thought I would post the results here.

The project basically draws a canvas that takes up the entire browser window (and redraws itself when the window is resized). A white dot is drawn on the screen and floats towards the bottom-right corner until the user swipes a finger (using a mobile device) or the mouse pointer (on a lap/desktop). The dot will switch directions to match the swipe. Try it out!. I had intended to get the dot to do more interesting things, but time gets away from me.

The folder structure holds three files in the root, and the rest of the folder structure looks like this:

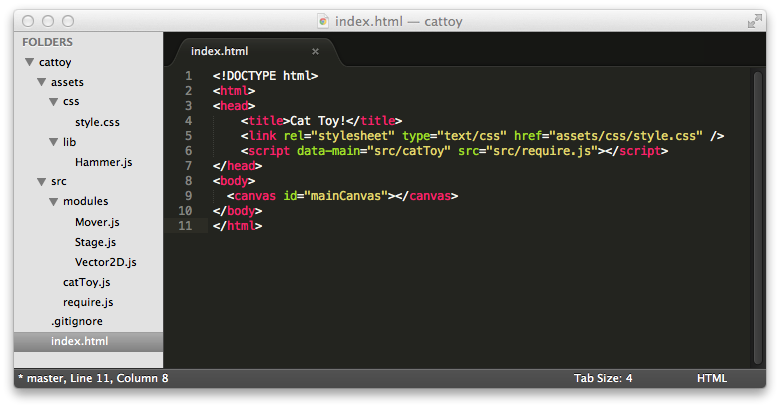
Screen Shot 2013-05-12 at 9.20.17 PM

Click here for full source

Notice that the only file in the root is index.html. Also notice that the only javascript file referenced in index.html is src/require.js, which has a data-main attribute stuck in there, as well. That data-main attribute references the entry point to the application. RequireJS will automatically append ‘.js’ to the filename, and will run whatever is in that file.

At the top of catToy.js is the following code:

requirejs.config({
  baseUrl: 'src',
  paths: {
    lib: '../assets/lib'
  },
  shim: {
    'lib/Hammer': {
      exports: 'Hammer'
    }
  }
});

This bit of code tells RequireJS what’s what. The baseUrl is a relative filepath that will act as the root for all other file paths referenced in the config block. The paths object is a list of aliases (shortcuts) to other subdirectories that contain code. The key (lib) is the alias name, and the value (‘../assets/lib’) is the file path relative to the baseUrl.

The shim object allows you to define modules that originally weren’t intended to be used with RequireJS. In this case, the Hammer library is referenced, and will export a ‘Hammer’ module that can be used in the project.

Underneath the config block is a function that acts as the main starting point of the application. The first two lines are the most important, in terms of RequireJS.

requirejs(["modules/Stage","modules/Mover","modules/Vector2D"],
  function( Stage,  Mover, Vector2D) {
    ...// application code goes here
});

This is basically a function call that says, “Hey, RequireJS!, do this! And don’t forget to load these three modules before you do it!”

The three modules in question are Stage, Mover, and Vector2D. The first parameter of the requirejs() function is an array of modules that are needed in the function that is passed in as the second parameter. RequireJS will look up the modules, and pass them into the anonymous function, using whatever names you define.

Each of the modules used here are set up to be specifically compatible with RequireJS using a function called define(). The first line of each module is very similar to that of catToy.js:

define(function(){
  ...// code goes here
});

Yeah, that’s it. Just wrap your code in the define() function and it can be used as a RequireJS module. If the module needs to use code from another module, then pass in an array of module names, just like before.

define( ['lib/Hammer'], function(Hammer) {
  ...// code goes here
});

© 2018 Eric Terpstra

Theme by Anders NorénUp ↑